A lot of Windows users have upgraded their OS to Windows 11, but as expected they are facing some issues with this new version of Windows. One common problem faced by many users is their printer stops working and is unable to print documents. In this guide, you will learn some methods which will help you fix ‘printer has stopped working (not printing) after upgrading to Windows 11’ problem on your computer.
Why Printer Stops Working after Windows 11 Upgrade?
There can be a variety of reasons behind the failure of your printer to work after Windows 11 upgrade, but the most primary ones are listed below:
Advertisement
- Incompatible Printer: If your printer is an old model printer, then you must check whether it’s compatible with Windows 11 or not. For this, you can visit your printer manufacturer website or official Microsoft Windows website. A simple Google search can also give a lot of information.
- Windows Update Problem: This problem can occur due to improper Windows Update, which means either you need to update your Windows with its latest update, or the latest update has gone bad and you need to uninstall it from your computer.
- Driver Issues: This problem can be caused if your printer driver is incompatible with Windows 11. To resolve this problem you will have to find the right driver for Windows 11 from the printer manufacturer website and install it on your computer.
There can be some other reasons as well if your printer has stopped working after you upgraded to Windows 11. However, it doesn’t matter what is causing this problem with your printer because the solutions given below will resolve this problem.
Fix: Printer Has Stopped Working (Not Printing) After Upgrading to Windows 11
We are sharing five methods to solve the printer not working problem in Windows 11. Read these methods one-by-one and follow the ones which satisfies your situation.
Method 1: Update Windows 11
If you have upgraded to Windows 11 recently and haven’t updated it regularly, then maybe you should. Sometimes the latest updates of Windows have files which can help in better functioning of your printer and other peripheral devices. Follow the steps given below to upgrade your Windows 11:
- Click the ‘Start’ button and choose ‘Settings’.

- In the Settings page, choose ‘Windows Update’ option and click on the ‘Check for updates’ button. Follow the instructions to complete the upgrade process, then restart your computer.

Check whether your printer is printing normally or not.
Method 2: Remove Last Windows 11 Update
If your printing problems started after the recent Windows update, then you must uninstall that update from your computer. Follow the steps given below:
- Click the ‘Start’ button and select ‘Settings’.

- In the Settings page, choose ‘Windows Update’ option and click on ‘Update history’ option.

- In the Update History page, choose ‘Uninstall updates’ option.

- In the list of Windows updates, select the most recent update and click on the ‘Uninstall’ button. Follow the prompts to remove the update, then restart your computer.

Check if your printer is printing normally or not.
Method 3: Run Printer Troubleshooter
If there is no problem with your Windows update, then you should run the printer troubleshooter. This is an in-built capability of Windows 11 that can help you resolve many printer issues via Windows troubleshooting application. Follow the instructions given below:
- Click the ‘Start’ button and go for ‘Settings’.

- In the Settings page, choose ‘System’ option, then scroll-down to locate and click ‘Troubleshoot’ option.

- In the Troubleshoot page, click on ‘Other troubleshooters’ option.

- In Other troubleshoothers, locate ‘Printer’ and click on the ‘Run’ button.

- Wait for the application to detect the problem with your printer, then follow the prompts to complete the troubleshooting process.

Restart your computer and verify whether your printer is working or not.
Method 4: Update Printer Driver
If none of the above solution worked for you, then it’s time that you should update your printer driver with its latest version. However, you should download the Windows 11 driver directly from the printer manufacturer’s website. We will describe the download process for the HP printers:
- Open your web browser and in address bar type ‘support.hp.com/drivers’, then press the ‘Enter’ button. In the options, click on the ‘Printer’.

- In the product name, type the name of your printer and select the right option from the search results.

- Make sure that the selected OS is Windows 11, otherwise, use the ‘Choose a different OS’ to select Windows 11.

- Scroll to find your preferred driver from the list and click on the ‘Download’ link.

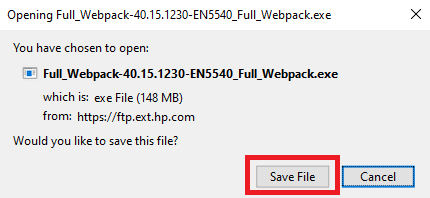
- Click on the ‘Save File’ button to start the download of the printer driver.

- Run the downloaded printer driver file and follow its instructions to install the printer driver on your computer.
That’s it, you have successfully installed the Windows 11 version of your printer driver on your computer. Restart your computer and try to print documents with your printer.
Method 5: Run System Restore
If none of the above methods were able to resolve this issue on your Windows 11, then the final solution is to use Windows System Restore. By using this method you can reset your Windows 11 to its last restore point when it was working properly. This solution is especially recommended if your printer was working properly some time ago.
- Click the ‘Search’ button, type ‘system restore’ in the search bar and choose ‘Create a restore point’ from the search results.

- In the System Properties window, make sure that the Protection is ‘On’ under Protection Settings, then click on the ‘System Restore’ button.

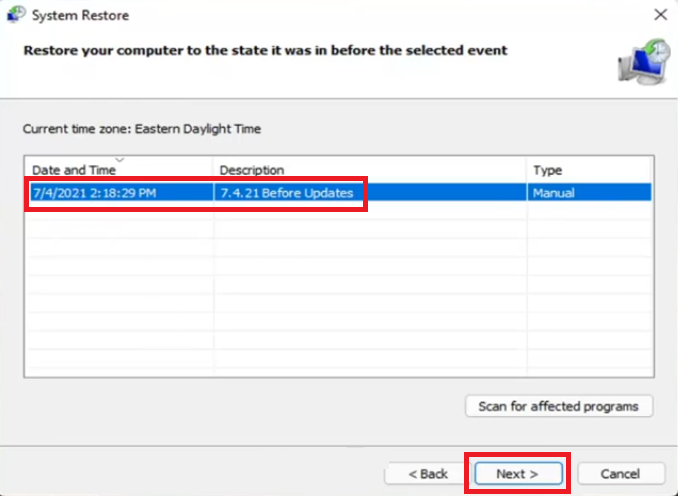
- In the System Restore screen, click on the ‘Next’ button to proceed.

- Choose the system restore point, then click on the ‘Next’ button.

- Click on the ‘Finish’ button to confirm the restore point.

- Click on the ‘Yes’ button to begin the system restore process.

- Wait for the Windows to prepare for the system restore.

- Your computer will restart and System Restore process will begin. Wait for its completion.

- Once System Restore is completed you will see the successful message.

Now, you should try to print with your printer and most probably it will work fine.
In order to fix ‘printer has stopped working (not printing) after upgrading to Windows 11’ problem on your computer you must follow the solutions given above.


What is going on? The printer has stopped working for us after installing Windows 11.
We can still and now HAVE TO EMAIL documents to the printer but they will not go direct.
CTRL P and Print Screen are not functioning. Neither is printing from Word or any other software.
We have an HP ENVY 5010.
Help! Any advice welcome.
Although this is a driver problem, try reinstalling the driver. It could be a matter of “Windows Update”. Make sure your computer is up to date with the latest update. Try updating Windows twice. Don’t forget to reboot the computer instead of shutting it down. When you reboot Windows 10-11, it will start alll its services from scratch.
Answer the following questions as well:
1) What exactly happens when you press the CTRL+P command?
2) What happens when you click on the printer icon or print command from the menu?
3) While getting the print screen option, are you getting your printer model number there?
4) Do you receive any specific error messages? If so, please share the whole error message with us here.
5) Go to the printers’ page and see if your printer is still listed.
Please explain your problem in more detail so that I can give my suggestions on that.
Additional: We tried removing and adding the printer. Both my wife and I got to the printer which issued us an 8 digit number to enter. When we did so the message we got was THAT DID NOT WORK.
As you know we are having to print using the EMAIL print option.
1) The dialog box comes up but we do not have the printer there to choose.
2) The dialog appears but we do not have the printer there to choose.
3) The answer is NO
4) “That did not work” when trying to ADD DEVICE
The system finds the printer, the printer issues an 8 digit number, we type in the number on our computers and then get the message “That did not work”
5) The printer is listed but the word “failed” is below it.
HELP!