
Is your printer automatically printing its “report page” everytime time you turn the printer on? Have you already tried restarting your printer and computer, but the problem still persists?
In this guide, I will provide you the workable solutions for the printer printing automatically.
Advertisement
Why does the printer keep printing the “report page” automatically?
There can be multiple reasons for this problem, but some of the most common ones I have discussed below:
- Communication Issue: Sometimes there can be issues with the communication between your computer and your printer. Due to this issue your printer may be printing report page each time it’s turned on and it tries to communicate with your computer.
- Print Spooler Issue: Maybe you tried to print your printer report page, but it never got cleared from the print spooler or your print spooler service is not functioning properly. In such a scenario, print spooler can send a command to the print report page each time you turn on your printer.
- Printer Driver Issue: If your printer driver is outdated or corrupted, then also you can experience several unexplained issues. One of them is the issue where your printer automatically prints its report page when turned on.
Now that you know the primary reasons causing this problem, it’s time to look at some effective solutions so that your printer can start functioning normally.
3 Solutions To Fix The Automatic Printing Issue
I have provided three solutions for this problem. You should try them one-by-one, preferably, in the order they have been mentioned. The simplest solution is mentioned first, then I have moved on to lengthy solutions.
Solution 1: Run Printer Troubleshooter
Windows has its own printer troubleshooter application, which you can use to check and solve the problems with the communication between your printer and computer. Follow the steps given below to use this application:
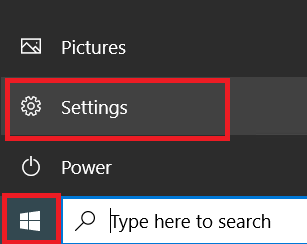
- Click on the ‘Start’ button and choose ‘Settings’ from the menu options.

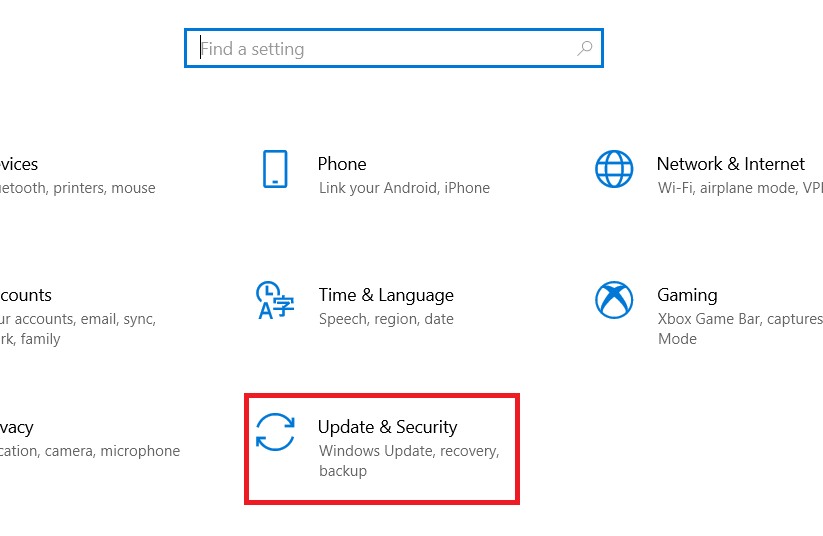
- In the Settings page, click on the ‘Update & Security’ option.

- In the Update & Security page, choose ‘Troubleshoot’ option in the left-pane, then click on the ‘Additional troubleshooters’ link.

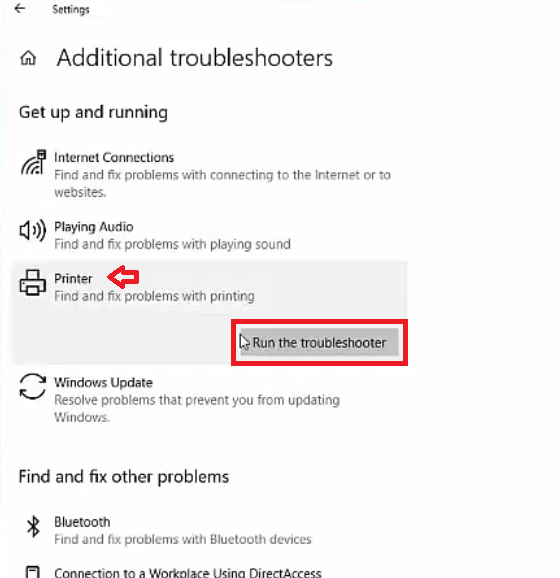
- In the Additional Troubleshooters, choose the ‘Printer’ option from the list, then click on the ‘Run the troubleshooter’ button.

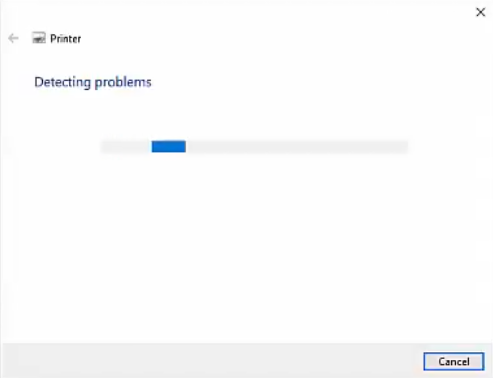
- Wait for the printer troubleshooter to detect the problem with your printer, then proceed with the instructions as they are displayed.


Now, you should restart your printer and if it’s still printing the report page, then try the next solution given below.
Solution 2: Stop and then start the print spooler
If the problem of automatically printing of the report page is due to print spooler, then you need to restart the print spooler service. Follow the steps given below to complete this task:
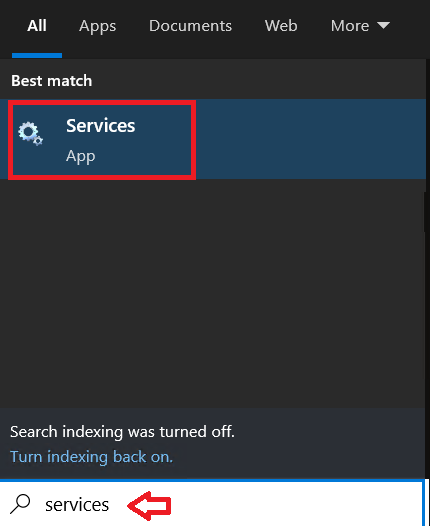
- In the search box, type ‘services’, then click on the ‘Services’ app in the search results.

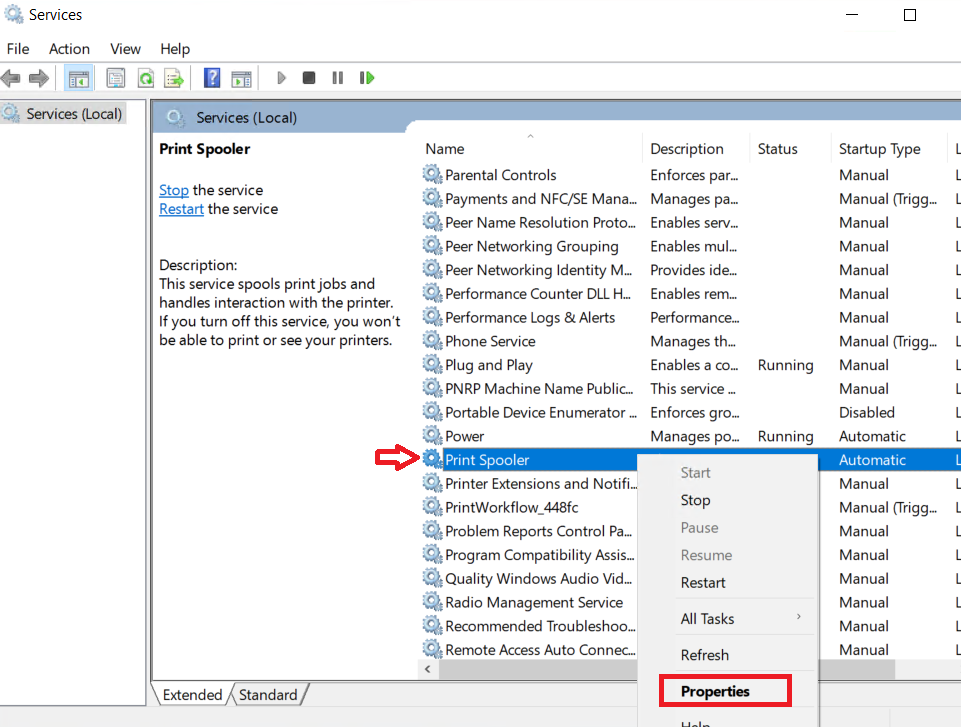
- In the Services window, find and right-click the ‘Print Spooler’ service, then choose the ‘Properties’ option from the menu options.

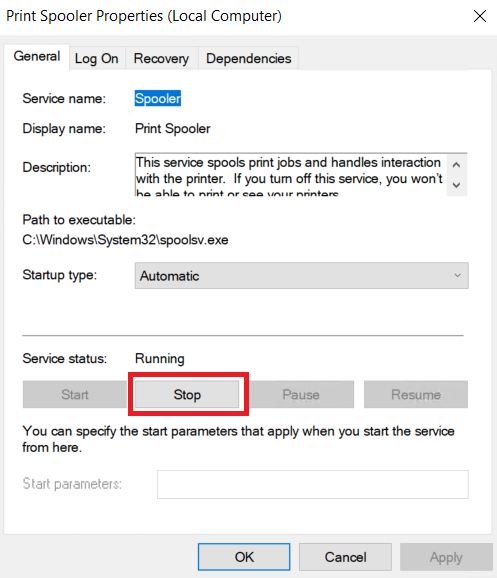
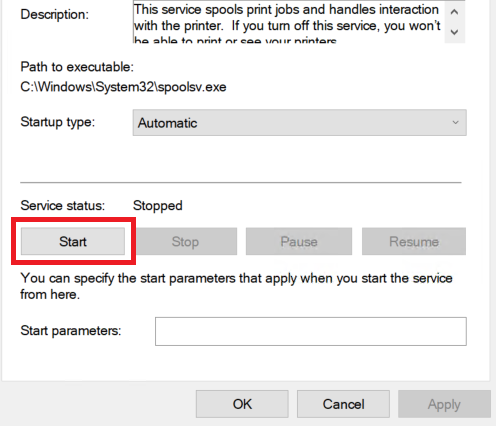
- In the Print Spooler Properties window, click on the ‘Stop’ button to stop the service.

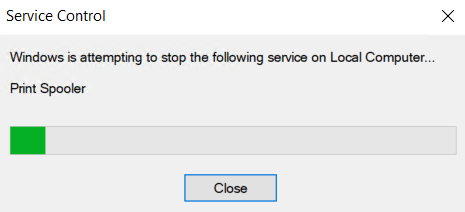
- Wait for the print spooler service to stop.

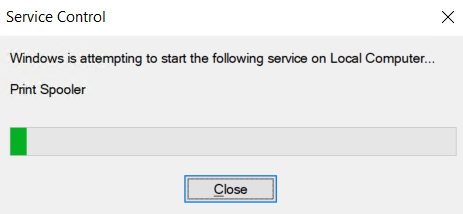
- Now, click on the ‘Start’ button to restart the print spooler service.

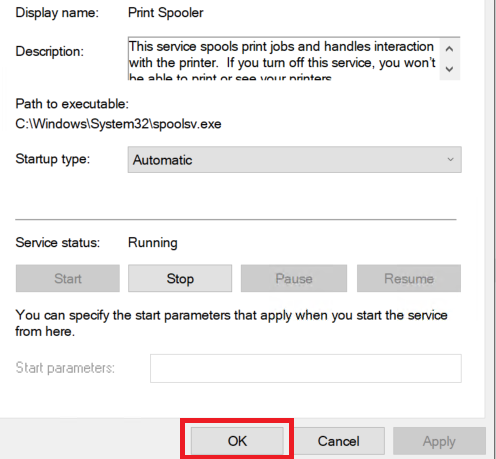
- Wait as the Windows starts the print spooler service on your computer.

- Click on the ‘OK’ button to close the printer spooler properties window.

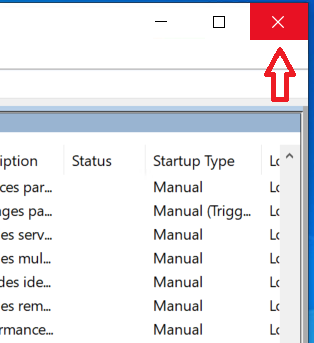
- Click on the ‘Close’ button on the top-right corner of the services window to close it.

After restarting the print spooler service, you should check if the automatic printing of the report page has stopped or not. If the problem persists, then try the next solution given below.
Solution 3: Reinstall Printer Latest Drivers
If all the above solutions have failed to solve your printer’s problem, then the final solution is to reinstall your printer’s driver. This solution may seem to be a bit lengthy, but it will surely solve your printing problems. First, you need to uninstall your printer driver, then in the next stage you should install its new printer driver.
Stage 1: Uninstall Printer Driver
Follow the steps given below to uninstall your printer from your computer:
- Click on the ‘Start’ button and select ‘Settings’ from the menu.
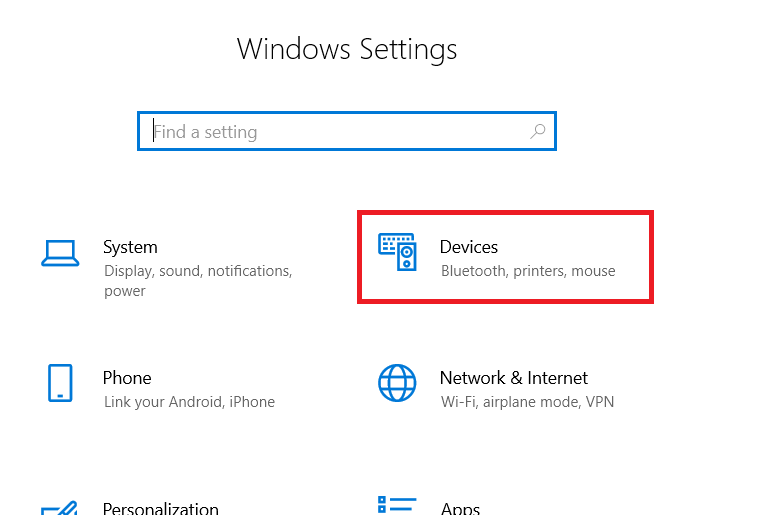
- In the Settings page, click on the ‘Devices’ option.

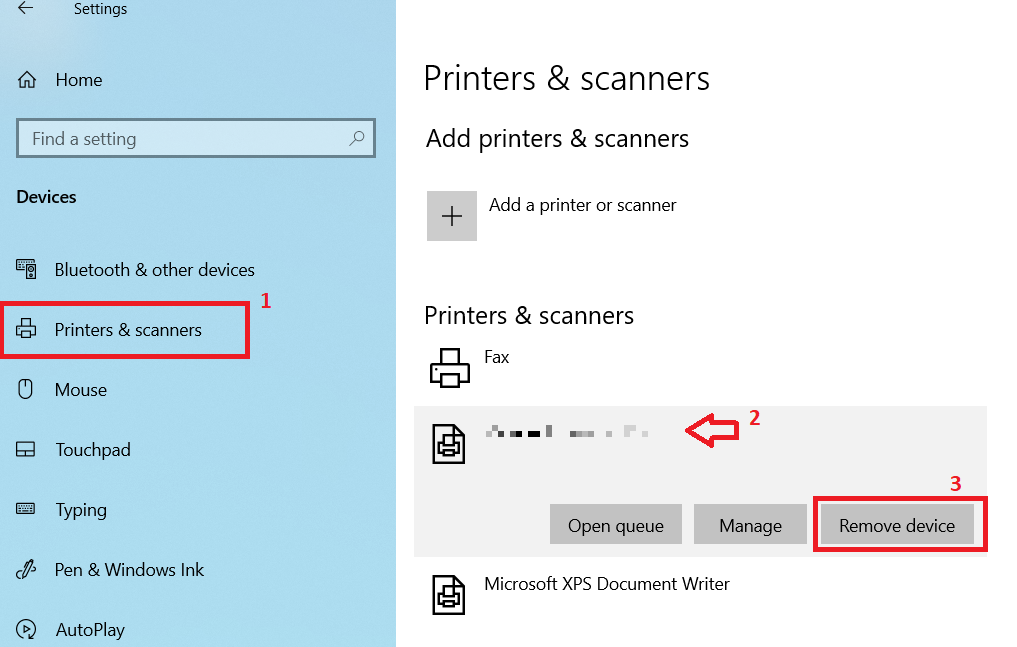
- In the Devices section, choose the ‘Printers & scanners’ option in the left-pane, then select the printer which you want to uninstall and click on the ‘Remove device’ button.

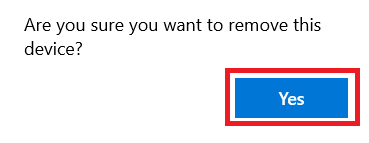
- Click on the ‘Yes’ button to confirm your choice.

That’s it, you have successfully uninstalled your printer. Now, you should install the most recent version of your printer’s driver on your computer. Therefore, follow the instructions in the next section to complete this task.
Stage 2: Install Printer Driver
Firstly, I want to mention that you should not install the universal printer driver of your printer as it wont help you in solving this problem. You should always install the full feature or basic printer driver of your printer model to solve this problem.
Installing the full feature driver is pretty straightforward, you need to run the driver file and follow the onscreen instructions to complete the driver installation process. However, installing the basic driver can be a complicated process for most users. Therefore, I will explain below the right method of installing the basic printer driver on a Windows 10 operating system, which you can follow for all the Windows OS versions.
- Click on the ‘Start’ button and choose ‘Settings’ from the menu.
- In the Settings page, click on the ‘Devices’ option.
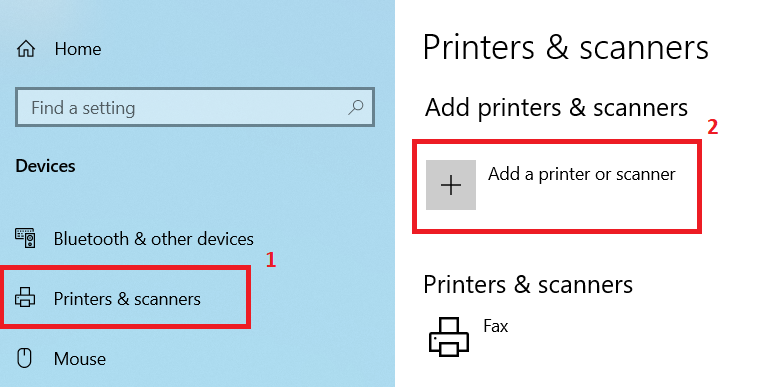
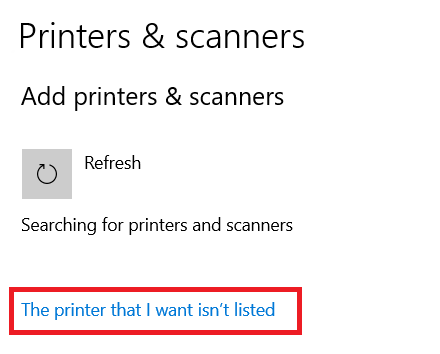
- Under the Devices section in the left-pane, select the ‘Printers & scanners’ option, then click on the ‘Add a printer or scanner’ button.

- Click on the ‘The printer that I want isn’t listed’ link when it appears.

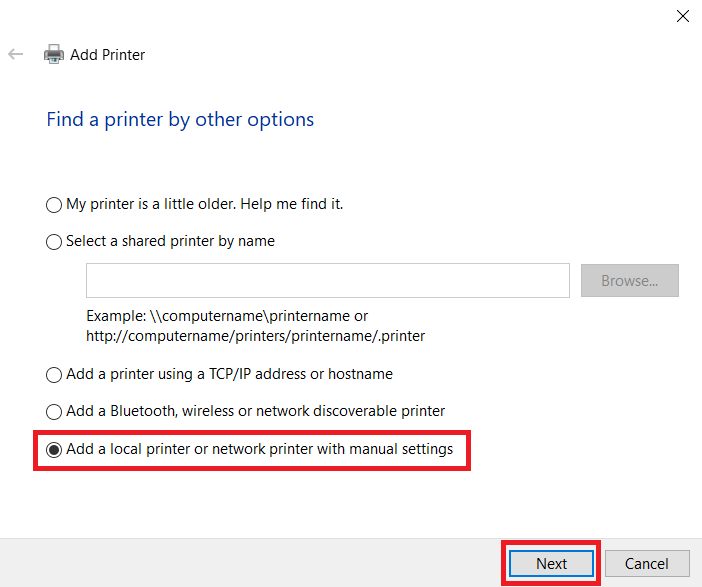
- In the Add Printer window, choose the ‘Add a local printer or network printer with manual settings’ option, then click on the ‘Next’ button.

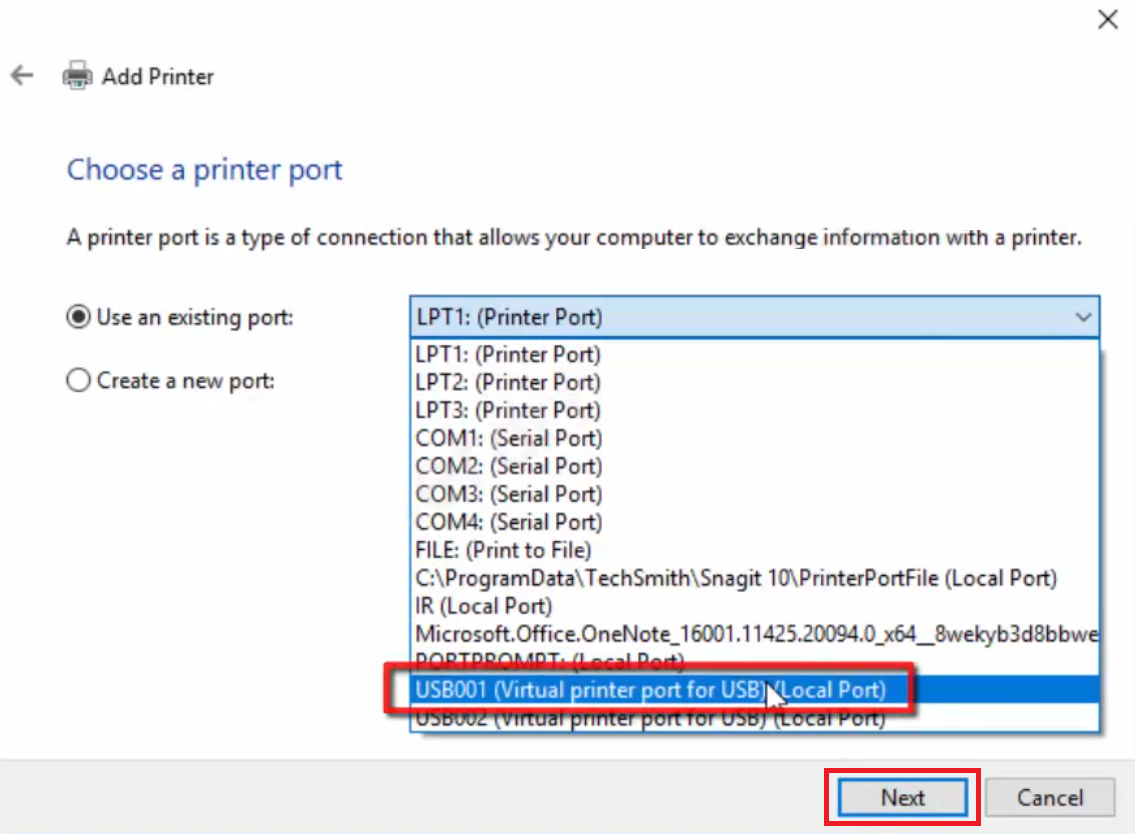
- In the Choose a printer port screen, choose the ‘USB’ port in the port list (or whichever port your printer is connected with), then click on the ‘Next’ button.

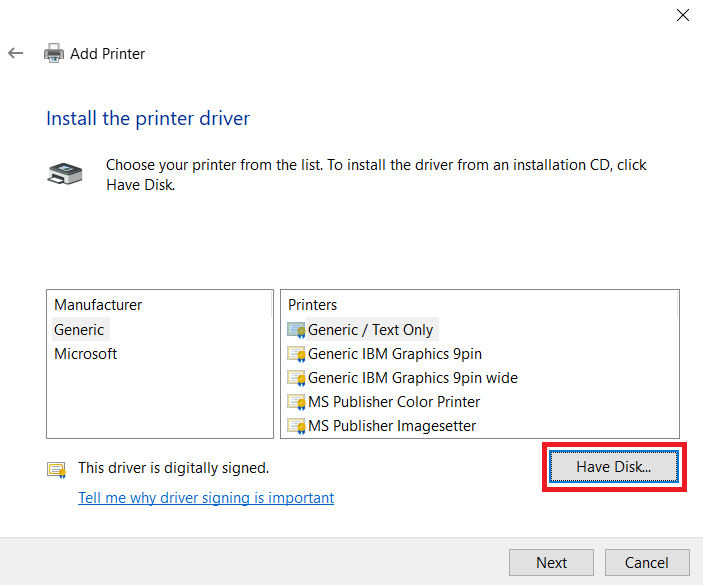
- In the Install the printer driver screen, click on the ‘Have Disk’ button.

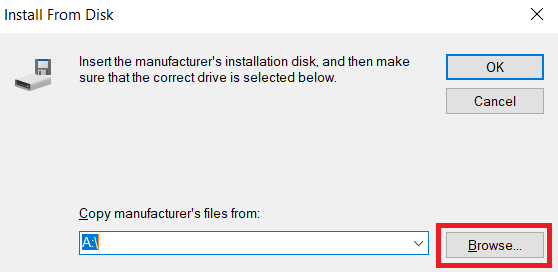
- In the Install from Disk dialog box, click on the ‘Browse’ button.

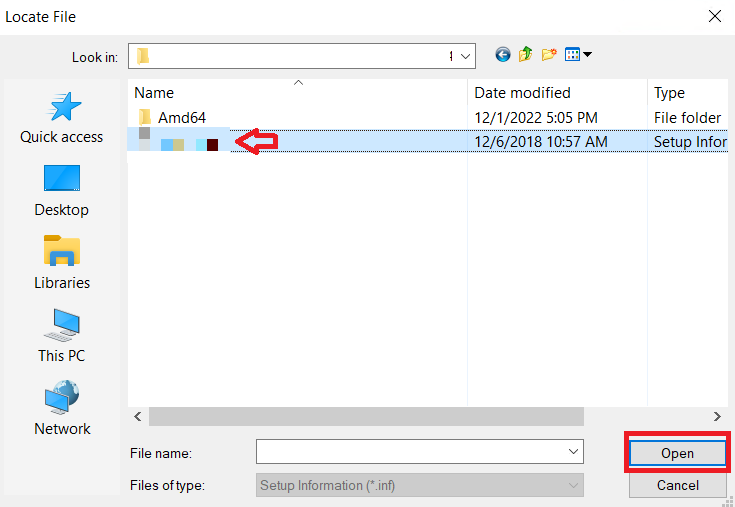
- In the Browse window, go to the folder where you have extracted the driver files and select the relevant file for your OS version, then click on the ‘Open’ button. Follow the prompts to proceed with the further steps and complete the printer driver installation process.

That’s it, you have successfully installed your printer drivers. Now the problem of “report page” being automatically printed by your printer when you turn it on, would have been solved.
My printer keeps printing the “report page” automatically when I turn it on, what to do? It’s a question that many users ask me. I have tried to answer this question with some effective solutions in this guide. Read the guide carefully and follow its instructions in their correct order to solve this problem.