A new operating system usually comes with some problems for most users. The same has happened with MacOS Monterey, which is giving some users problems with their printer. The printer just stopped printing after upgrading to Monterey 12.x. Therefore, if your printer has stopped printing after upgrading to MacOS Monterey 12.x, then in this guide, we will share some highly effective solutions to fix this problem.
Simple Solutions to Printing Problems on MacOS Monterey 12.x
Before you move on to some lengthy solutions, we would suggest you to solve your printing problems on Mac by trying the simple solutions given below:
Advertisement
Check Printer: Make sure your printer’s connecting cable is firmly connected to your computer and that its power cable is plugged to the power outlet and is switched on. Also, your printer should have enough paper and ink/toner in its cartridges. The status lights of your printer must be in normal condition and there should be no paper jamming.
Check Network: If you are trying to print through wireless network, then make sure that your printer and computer are connected to the same network. In case, there are multiple printers connected to the network, then make sure that you have selected the right printer.
Check Sharing: If the printer you are using is shared by another Mac computer, then make sure that the other computer is running a MacOS 10.5 or later version. Also, the sharing should be turned on in that computer and must not be in sleep mode.
If the above solutions didn’t work for you, then you will have to follow the solutions given below.
Fix: Printer has Stopped Working (Not Printing) after Update of MacOS Monterey 12.x
When your printer stops working after upgrading to MacOS Monterey 12.x, then the solutions given below will surely solve this problem. Follow the solutions in their correct order to save your time and effort.
Solution 1: Resume Printing
Sometimes the document that needs to be printed gets stuck in the print queue. This problem can be easily solved by resuming the printing of that document.
- Click the ‘apple’ and choose ‘System Preferences’ from the drop-down options.

- In the System Preferences window, click to open ‘Printers & Scanners’.

- In the Printers & Scanners window, select your printer and click on the ‘Open Print Queue’ button.

- In the print queue window, click the ‘Resume’ button if printer is paused. In case, the document that you want to print is stuck because of some other print job in the queue, then ‘Delete’ that print job.
Check whether your printer is working properly or not. If this solution didn’t solve your problem, then try the next one.
Solution 2: Try Different App
Maybe there is some problem with the application through which you are trying to print the document. Therefore, you should try to print something by using another application, such as TextEdit. If the other application is able to print properly, then the problem is with the original application through which you were trying to print. Therefore, you should review the documentation of that application.
Solution 3: Update MacOS
Although MacOS Monterey is the latest operating system from Apple, but there are updates available for this OS and if you haven’t updated it yet, then you must perform this task.
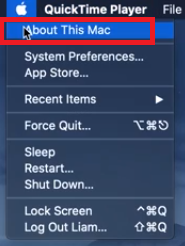
- Click on ‘apple’ and choose ‘About This Mac’ option.

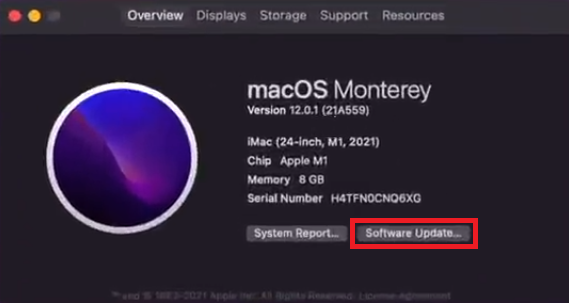
- In About, click on the ‘Software Update’ button.

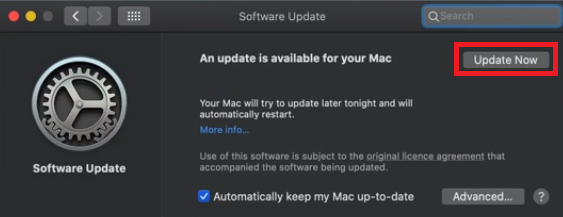
- In Software Updates, click on the ‘Update Now’ button and wait for the update to complete.

Try to print with your printer again. If updating Monterey 12.x didn’t work for you, then try the next solution.
Solution 4: Re-add your Printer
You can remove, then again add your printer to resolve this problem. Follow the steps given below to complete this task successfully.
- Click on ‘apple’ and choose ‘System Preferences’ from the options.

- In System Preferences, click on the ‘Printers & Scanners’ option.

- Select your printer in the printer list and click on the ‘minus’ button below.

- Click on the ‘Delete Printer’ button to confirm it.

- Once the printer is removed, click on the ‘plus’ button and choose ‘Add Printer or Scanner’ option.

- In the Add window, choose your printer from the list and wait till it gathers printer information.

- Click on the ‘Add’ button to add your printer.

- Wait for the Mac to setup your printer.

- When you see your printer listed in the printers section, then try to print some documents with it.

- If your printer doesn’t print properly, then you can try to reset your printing system. Resetting the printing system will activate the default settings. To do that you should press and hold the ‘Ctrl’ key on your keyboard, then click on the printer name in the list. From the displayed options select ‘Reset printing system’. Wait for the printing system to reset.

- After resetting your printing system, the list of printers will become empty. Follow the steps given above to re-add your printer.
Once all the above steps have finished you should try printing with your printer again. If your printer is still not working, then go for the final solution below.
Solution 5: Reinstall your Printer
If all the above solutions fail to solve your problem, then you should reinstall your printer with its latest drivers for MacOS Monterey 12.x. Follow the steps given below:
- Click on ‘apple’ and select ‘System Preferences’.

- In System Preferences, click on ‘Printers & Scanners’.

- Choose your printer from the list and click on the ‘minus’ button.

- Confirm your action by clicking on the ‘Delete Printer’ button.

- After removing the printer, click on the ‘Finder’.

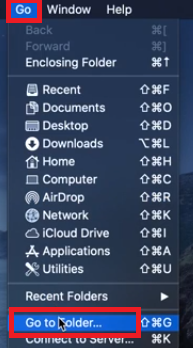
- Click on ‘Go’ and select ‘Go to Folder’ option.

- In the address box, type ‘/Library/Printers/’ and click on the ‘Go’ button.

- In Printers, select and delete the folder associated with your printer manufacturer. Doing this will completely remove all the drivers of your printer from your computer.

Now your printer is completely uninstalled from your computer. You should visit the website of your printer manufacturer and download the official driver for Monterey 12.x, then install it on your computer.
Conclusion
The solutions given above will surely help more than 90% of the users to fix the problem when their printer has stopped working (not printing) after upgrading to MacOS Monterey 12.x.
FAQ
Q: Dell stated that their printer 1355cn driver is not being updated so I cannot use it on my Mac Os 12.x. any work around. its a great printer it works.. I cant afford a new printer.. also dell stopped making printers...
A: 1) Try its previous version driver, it should work: Previous version Driver Download Link.
2) Try this solution: https://www.dell.com/support/kbdoc/en-in/000135885/how-to-install-and-configure-a-dell-print-driver-on-mac-os-x


does not solve the problem of getting the system to display printer queue or to allow access to scanners. Monterey is unresponsive to these commands.
I learned the very hard way!! After uninstalling and reinstalling…I downloaded new firmware for the printer, and had to go into the settings on the actual printer and upgrade the firmware via usb connection to the computer. It all works well now.
Great!! Thanks for sharing this useful info.
dell stated it wont work as they are not creating an updated driver for the 1355n for mac os 12.x. this is ridiculous in my opinion, anyone have a work around?
Many thanks!!! My Canon printer seems to be working again after Monterrey update from Sierra OS. Appreciate your documentation and sharing
Question sir. I have samsung Scx 3401 I want to connect my mac so 12.6.8 Monterey . I need latest driver help me
Try this? https://ftp.hp.com/pub/softlib/software13/printers/SS/Print_Common_SW/Wireless_Setting_Mac_V1.4.25.zip