Paper jam (paper stuck inside the printer) is a common problem for anyone who uses the printer. Most users don’t know what to do when their printer says “Paper Jam” on the printer screen or computer screen. In order to solve this problem, you’ll have to fix it manually. Let’s see how to do.
This guide will help you solve paper jam errors for all types of printers. Design for most printers of various brands are almost the same Brother, Canon, Epson, Lexmark, and Dell. However, based on the brand and model number of your printer you may have to make some adjustments to the steps mentioned below. Therefore, the steps to be followed may slightly differ for your printer, but no paper jam error can be resolved without following the steps given below.
Advertisement
Important Precautions.
You must take some precautions so that your printer shouldn’t get damage while trying to solve paper jam errors. For instance, you should rarely perform under the front cover removal of the jammed paper, instead, try to pull it out from the back of the paper tray or printer.
Please, read this guide completely before you try to solve the paper jam issue of your printer. After a complete read follows this guide one step at a time.
How to Fix Printer Paper Jam
Follow the below given step-by-step guide to fix the paper jam issue permanently. We explained it in four steps.
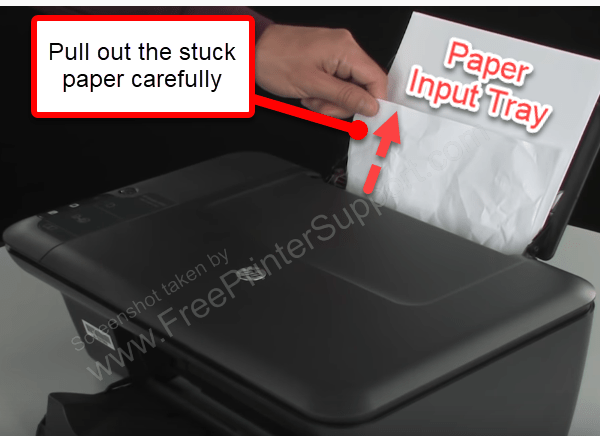
Step 1: Remove stuck paper from the paper input tray.
In this step, we’ll pull out the stuck paper from printer paper input tray. Clear the paper if it appears stuck in between the loading tray and the paper taking rollers. Clear any obstruction in the paper path.
- If there is any loose paper in the loading tray, remove all of them.
- Start from the middle paper, remove jammed paper one by one. Now clearing the stuck paper gently.

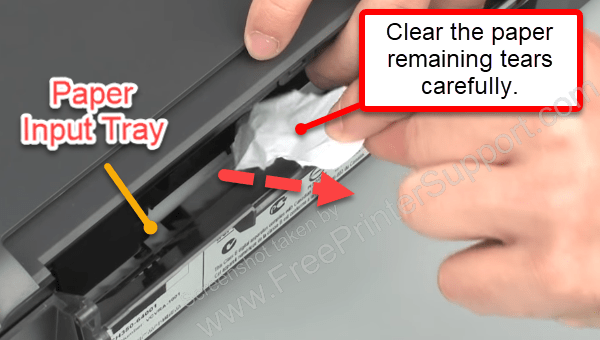
- Make sure no bits of paper remain in the printer.

- Press the power button to turn off the printer.
- Remove the power cable and USB cable from the back of the printer.
- Now check for any obstruction is not happening in the paper loading tray.
If this doesn’t solve your problem, then move to the next step.
Step 2: Clear the Paper from Printer Rear or Back Access
In case, you are unable to remove the stuck paper from the loading tray, but you can see the stuck paper then follow the steps given below steps.
There is a rear panel or back panel which will be an access cover that is specially designed to take out the jammed paper from there or for cleaning maintenance. So, find out that area according to your printer model number. This may vary model to model.
- Open rear or bottom panel. On the rear panel look for access tab or knob and move it to unlock the rear panel. If your printer does not have this option then try this one: simultaneously press the two release buttons on the end of the module and remove it. See the following screenshots.

- After removing the panel take out stuck paper carefully. Use both the hands to take out the stuck paper.

- Check for the remaining bits of paper and clean them.
- Put back the rear or back panel as before.
Step 3: Pull out the Jammed Paper from the Cartridge Area
- Open the cartridge access store.
- Check that area for jammed paper.
- Carefully remove if you see any stuck paper there. Use both hands to pull it up gently.

- Close the Cartridge access Store.
Step 4: Check the Paper output tray for any Jam paper.
If you failed to remove it from back, rear, inside from the printer then we’ll try to remove it from then output try.
Preferably, you should never try to pull out the stuck paper from under the front cover. However, if all the above-mentioned steps fail to remove the jam paper, then slowly try to pull out the stuck paper from under the front cover. This step needs to be performed carefully, otherwise, it can cause damage to the printer or paper can be tearing the paper and stuck more badly.
- Check the paper output tray for any jammed paper.
- If you see any paper, then remove it carefully.

- Make sure the paper, not tears while removing it. If it did, then remove it properly.
- Re-Connect the power cord and USB cable and turn on the printer.
- Check for a test print.
Step 5: Check obstruction around the rollers & Wheels.
The pieces of paper might have remained inside the printer. Take a flash light and check and remove any obstructions (Pieces of paper) if found in checking the printer rollers and wheels. Move the cartridges on its bar and there is no obstruction there as well. Make sure the cartridges are moving freely from all the way to left and right. After removing all the obstructions, you may close the ink cartridge store cover and give a test page command.
Step 6: Clean the printer rollers.
Simply get access to the printer rollers that you can see from all the covers and clean them with a clean Coton with the clean water. You can use an ear bug for this. Make sure, don’t put extra water on the rollers, remove the access water using the tissue paper.
That’s it.
After you have performed the steps mentioned above you should turn on your printer and print a test page to check if your paper jam issue has been resolved.
If this doesn’t fix, make sure it is not a hardware issue. Do power drain your printer and check it one again. If it doesn’t fix then contact the printer’s support guys to fix it up.
We love to hear your experience in the comments section down below.


